Easy Diy Kids Costumes
Easy DIY Halloween Costumes for Kids (No Sewing Required)
Halloween is just around the corner, and if you're looking for easy DIY Halloween costumes kids will love without the hassle of sewing, you've come to the right place! Whether you're a busy parent, crafting newbie, or simply prefer no-sew solutions, these creative costume ideas will have your little ones ready for trick-or-treating without breaking the bank or your schedule.
In this comprehensive guide, we've compiled 25 amazing no-sew costume ideas organized by age group, complete with step-by-step instructions for our top 10 favorites, detailed materials lists, safety tips, and budget breakdowns to help you create magical Halloween memories.
Why Choose No-Sew Halloween Costumes?
No-sew costumes offer numerous advantages for busy families:
- Time-saving: Create complete costumes in 1-2 hours instead of days
- Budget-friendly: Use items you already own or inexpensive craft supplies
- Stress-free: No sewing skills or equipment needed
- Customizable: Easy to adjust sizing and personalize
- Kid-friendly: Simple enough for children to help create their own costumes
25 No-Sew Costume Ideas by Age Group
Toddler Costumes (Ages 2-4)
1. Jellyfish
Transform a clear umbrella and streamers into an adorable sea creature. Perfect for wiggly toddlers who need freedom of movement.
2. Bubble Bath
White clothing covered in balloons creates the cutest bath-time costume. Bonus: built-in entertainment!
3. Ice Cream Cone
A brown paper bag decorated as a cone paired with a colorful pom-pom headpiece makes a sweet treat.
4. Ladybug
Red clothing with black construction paper dots and simple antenna headband—classic and cute.
5. Cloud with Rainbow
Fluffy white outfit with colorful ribbon streamers creates a whimsical weather costume.
6. Garden Gnome
Red hat, overalls, and a cotton ball beard transform your toddler into a magical garden friend.
7. Popcorn Box
A decorated cardboard box painted red and white with yellow balloons for "popcorn" on top.
8. Little Monster
Colorful clothes with felt spots, googly eyes, and a construction paper horn headband.
Elementary Age Costumes (Ages 5-10)
9. Galaxy/Space Explorer
Black clothing decorated with glow-in-the-dark stars and planets using fabric markers.
10. Scarecrow
Flannel shirt, jeans, and raffia strands hot-glued to sleeves and hat for a classic farm look.
11. Emoji
Yellow shirt and pants with printed emoji face features attached—pick their favorite expression!
12. Crayon Box
Cardboard box decorated as a Crayola box with the child as the "crayon" inside.
13. Minecraft Character
Cardboard boxes painted as blocky game characters—Steve, Creeper, or Enderman.
14. Superhero
Cape made from fabric (no sewing—use fabric glue), mask, and accessories in their chosen colors.
15. Donut
Brown or pink clothing with a pool float decorated as frosting and sprinkles.
16. Mummy
White clothing with gauze or toilet paper wrapped around (use double-sided tape to secure).
17. Tourist
Hawaiian shirt, camera, fanny pack, and sunscreen on nose—hilariously recognizable!
Tween Costumes (Ages 11-13)
18. Social Media App
Cardboard frame decorated as their favorite app with costume matching the theme.
19. Decades Character (50s, 60s, 70s, 80s, 90s)
Thrift store finds styled for any era—no alterations needed.
20. Gumball Machine
Clear garment bag filled with colorful balloons worn over red clothing.
21. Error 404 Costume Not Found
White shirt with printed error message—perfect for tech-savvy tweens.
22. Cereal Killer
Attached mini cereal boxes with plastic knives to clothing—punny and creative.
23. Bob Ross
Curly wig, button-up shirt, jeans, and a small easel with palette.
24. Deviled Egg
White clothing with yellow felt circle and red horns—clever wordplay costume.
25. Thing 1 or Thing 2
Red shirt with iron-on or fabric-glued letters, blue wig—perfect for siblings or friends.
Top 10 Costumes: Complete Step-by-Step Instructions
1. Jellyfish Costume (Toddler/Elementary)
Difficulty: Easy | Time: 30 minutes | Budget: $8-$15
Materials Needed:
- 1 clear umbrella
- 4-6 crepe paper streamers (various blues, purples, pinks)
- Hot glue gun and glue sticks
- Battery-operated LED fairy lights (optional)
- Coordinating clothing (blue, purple, or white)
Step-by-Step:
- Gather all materials on a clean workspace
- Cut crepe paper streamers into 3-foot lengths (varying slightly for dimension)
- Heat up hot glue gun and apply small dots of glue around the inside edge of the umbrella
- Attach streamers evenly around the umbrella perimeter, pressing firmly
- Optional: Weave LED lights through streamers for a glowing effect
- Let child wear coordinating colors underneath
- Child holds umbrella overhead while trick-or-treating
Safety Tip: Ensure umbrella handle is easy for child to grip. For very young children, consider securing umbrella to a hat for hands-free movement.
2. Galaxy Explorer Costume (Elementary/Tween)
Difficulty: Easy | Time: 45 minutes | Budget: $10-$20
Materials Needed:
- Black long-sleeve shirt and pants
- Glow-in-the-dark fabric paint or markers
- Silver fabric paint
- Sponges (various sizes)
- Printed planet/star stencils (or freehand)
- Aluminum foil
- Cardboard for accessories
Step-by-Step:
- Lay black clothing flat on protected surface with cardboard inside to prevent bleed-through
- Dip sponge in white/silver paint and dab randomly for "stars"
- Use glow-in-the-dark paint to add larger stars and planets
- Add swirls and galaxy patterns with purple, blue, and pink paint
- Let dry completely (2-4 hours)
- Create aluminum foil accessories: wrist cuffs, belt, or headpiece
- Optional: Make cardboard jet pack covered in foil
Pro Tip: Test paints on scrap fabric first. Use fabric medium mixed with acrylic paint for washability.
3. Scarecrow Costume (All Ages)
Difficulty: Very Easy | Time: 20 minutes | Budget: $5-$12
Materials Needed:
- Flannel shirt (oversized works great)
- Jeans or overalls
- Natural raffia or hay (available at craft stores)
- Hot glue gun
- Old hat (straw hat preferred)
- Black fabric paint or eyeliner for nose
- Safety pins or fabric glue
Step-by-Step:
- Put on flannel shirt and jeans
- Cut raffia into 6-8 inch pieces
- Hot glue small bundles of raffia to cuffs of shirt sleeves
- Glue raffia to hem of shirt
- Attach raffia around collar area
- Glue raffia around hat brim
- Use black paint to draw triangle nose or use eyeliner day-of
- Mess up hair and add hat
Customization: Add colorful patches using felt and fabric glue for a more detailed look.
4. Emoji Costume (Elementary/Tween)
Difficulty: Easy | Time: 40 minutes | Budget: $8-$15
Materials Needed:
- Solid yellow shirt and pants or leggings
- Yellow poster board or cardboard
- Black, red, white felt sheets
- Scissors
- Hot glue or fabric glue
- Elastic string for mask option
Step-by-Step:
- Choose favorite emoji (heart eyes, laughing, sunglasses, etc.)
- Cut yellow poster board into large circle for face or mask
- Cut felt pieces for facial features based on chosen emoji
- Arrange features on yellow circle and glue securely
- Either attach to shirt front or create mask with elastic
- For mask: punch holes on sides and attach elastic to fit around head
- Wear all yellow clothing underneath
Popular Emoji Options: 😂 Laughing, 😍 Heart Eyes, 😎 Sunglasses, 🤔 Thinking Face
5. Superhero Costume (All Ages)
Difficulty: Easy | Time: 1 hour | Budget: $12-$25
Materials Needed:
- 1 yard fabric in chosen color (felt works great)
- Fabric glue or hot glue gun
- Felt pieces for emblem/logo
- Solid colored shirt and pants matching theme
- Ribbon or Velcro for cape closure
- Felt or cardboard for mask
- Optional: foam sheets for accessories
Step-by-Step:
- Cut fabric into cape shape (rectangle with rounded bottom)
- Create emblem using contrasting felt letters or symbols
- Glue emblem to cape center
- Attach ribbon or Velcro at top corners for neck closure
- Cut mask shape from felt, add elastic
- Create matching wrist cuffs from felt with Velcro closure
- Optional: Make belt from felt with emblem buckle
Safety Note: Ensure cape isn't too long to prevent tripping. Cape should end at knee level or higher.
6. Donut Costume (Toddler/Elementary)
Difficulty: Medium | Time: 1 hour | Budget: $15-$25
Materials Needed:
- Pool float or swim ring
- Pink or brown felt (3-4 yards)
- Fabric glue or hot glue gun
- Multi-colored pom-poms or felt circles for sprinkles
- Matching colored shirt and leggings
- Safety pins
Step-by-Step:
- Cover pool float completely with felt using hot glue
- Cut second color of felt into frosting drip shapes
- Glue frosting pieces around top half of float
- Attach colorful pom-poms randomly as sprinkles
- Use safety pins to secure float to shirt at shoulders (test for comfort)
- Wear coordinating clothing underneath
Variation: Make it a chocolate donut with brown base and pink frosting, or strawberry with pink base and white frosting.
7. Mummy Costume (Elementary/Tween)
Difficulty: Very Easy | Time: 30 minutes | Budget: $5-$10
Materials Needed:
- White or beige long underwear or pajamas
- 2-3 rolls white crepe paper or gauze
- Double-sided tape or safety pins
- Black eyeliner or face paint
- Optional: fake blood for zombie mummy effect
Step-by-Step:
- Put on white base clothing
- Start wrapping crepe paper around one leg, securing with tape
- Continue wrapping both legs, leaving gaps for effect
- Wrap torso and arms, crisscrossing for authentic look
- Leave small gaps to show base layer
- Wrap around neck and head, leaving face exposed
- Apply dark eye makeup for spooky effect
- Optional: Add fake blood stains
Pro Tip: Use tape generously to prevent unwrapping during trick-or-treating. Bring extra roll for repairs.
8. Tourist Costume (Tween)
Difficulty: Very Easy | Time: 15 minutes | Budget: $10-$20
Materials Needed:
- Hawaiian or loud printed shirt
- Khaki shorts
- Fanny pack
- Camera (toy or old phone)
- White socks with sandals
- Sunglasses
- Map or travel brochure
- Sun hat
- Zinc oxide or white face paint for nose
Step-by-Step:
- Put on Hawaiian shirt and shorts
- Add white socks with sandals
- Wear fanny pack around waist
- Hang camera around neck
- Add sun hat and sunglasses
- Carry map folded awkwardly
- Apply white zinc oxide or paint to nose
- Optional: Attach travel stickers to shirt or camera
Character Tip: Practice tourist poses and phrases like "Can you take my picture?" for extra laughs!
9. Crayon Box Costume (Elementary)
Difficulty: Medium | Time: 1.5 hours | Budget: $10-$18
Materials Needed:
- Large cardboard box (refrigerator box is ideal)
- Yellow, blue, green paint
- Black marker or paint
- "Crayola" logo printed and glued (or hand-drawn)
- Suspenders or ribbon
- Scissors and ruler
- Colored shirt matching crayon choice
Step-by-Step:
- Cut head hole in box top and arm holes on sides
- Paint box yellow with blue and green accents
- Draw or print "Crayola" logo on front
- Create crayon color labels on front
- Attach ribbon or suspenders inside to hold box on shoulders
- Child wears colored shirt to be the "crayon" inside
- Optional: Make pointed crayon hat from construction paper
Group Idea: Multiple children can each be different crayon colors!
10. Minecraft Character Costume (Elementary/Tween)
Difficulty: Medium | Time: 2 hours | Budget: $15-$30
Materials Needed:
- Large cardboard boxes (1 for head, optionally more for body)
- Acrylic paint in character colors
- Pixelated character printouts (scaled to box size)
- Mod Podge or glue stick
- Scissors and box cutter (adult use)
- Ruler for measuring squares
- Coordinating clothing
Step-by-Step:
- Cut cardboard box to fit over child's head with face opening
- Paint base color (green for Creeper, light blue for Steve, etc.)
- Use ruler to mark pixel grid squares
- Paint character features in blocky pixel style OR
- Print scaled images and Mod Podge onto box
- Let dry completely
- Optional: Create pixelated chest piece from second box
- Wear coordinating colors underneath
Popular Characters: Creeper (green), Steve (blue), Alex (orange), Enderman (black)
Complete Materials Shopping List
Basic Craft Supplies (Useful for Multiple Costumes)
- Hot glue gun and glue sticks: $8-$15
- Fabric glue: $4-$7
- Scissors: $5-$10
- Double-sided tape: $3-$5
- Safety pins: $3-$5
Common Costume Materials
- Felt sheets (various colors): $0.30-$0.50 each
- Cardboard boxes: Free (ask local stores) or $5-$15
- Crepe paper streamers: $1-$2 per roll
- Poster board: $1-$3 per sheet
- Acrylic paint: $1-$3 per bottle
- Fabric markers: $5-$12 per set
- Elastic string: $3-$6
- Pom-poms: $4-$8 per bag
- Googly eyes: $3-$6 per bag
- Raffia/hay: $5-$8 per bag
Where to Shop
Browse our Halloween costumes collection and costume accessories for pre-made items to complement your DIY creations!
Safety Considerations for DIY Costumes
Visibility and Mobility
- Reflective tape: Add reflective strips to dark costumes for evening visibility
- Lighting: Incorporate glow sticks or LED lights for safety
- Length: Ensure costumes aren't too long to prevent tripping
- Arm mobility: Test that children can move freely and hold treat bags
- Vision: Make sure masks or headpieces don't obstruct vision
Material Safety
- Flame resistance: Choose flame-resistant fabrics when possible
- Non-toxic: Use only non-toxic paints, glues, and face paints
- Age-appropriate: Avoid small parts for children under 3
- Skin sensitivity: Test face paints on small skin area first
- Breathability: Ensure costumes allow adequate ventilation
Construction Safety
- Hot glue: Adults should handle hot glue guns; supervise older children closely
- Sharp tools: Adults only for cutting cardboard and hard materials
- Secure attachments: Double-check all glued pieces are secure
- No choking hazards: Ensure buttons, pom-poms firmly attached
- Comfortable fit: Test costume wear before Halloween night
Weather Considerations
- Layering: Design costumes to fit over warm clothing for cold climates
- Ventilation: Add hidden vents in enclosed costumes for warm weather
- Rain backup: Consider how costume holds up if it gets wet
- Flexibility: Have a simplified version ready if weather turns bad
Budget Breakdown: DIY vs. Store-Bought
Budget Tier: $5-$10
Best Costumes: Mummy, Tourist, Scarecrow, Emoji (shirt-based)
What you'll need: Primarily household items plus 1-2 craft supplies
Perfect for: Last-minute costumes, multiple children, tight budgets
Mid-Range: $10-$20
Best Costumes: Jellyfish, Galaxy Explorer, Superhero, Donut
What you'll need: Basic craft supplies plus specialty items (fabric, pool float)
Perfect for: Unique costumes with moderate detail, reusable materials
Premium DIY: $20-$30
Best Costumes: Minecraft character, Gumball machine, Crayon box
What you'll need: Multiple materials, specialty paints, larger supplies
Perfect for: Show-stopping costumes, sibling groups, hobby crafters
Cost Comparison
- Store-bought costume: $30-$60+ (single use, limited sizes)
- DIY costume average: $15 (customizable, reusable materials, multiple costumes from same supplies)
- Savings: 50-75% compared to retail costumes
Money-Saving Tips:
- Shop your home first—use existing clothing as base
- Dollar stores for craft supplies (felt, paint, streamers)
- Raid recycling bin for cardboard and containers
- Borrow specialty tools (hot glue guns) from friends
- Coordinate with friends to share materials
- Check out our kids costumes collection for mix-and-match accessories to enhance DIY creations!
Frequently Asked Questions
How far in advance should I start a no-sew costume?
For most no-sew costumes, you'll only need 1-3 hours of actual crafting time, so starting just a few days before Halloween is perfectly fine! However, we recommend beginning at least one week ahead to account for:
- Gathering materials (shopping trips, delivery times)
- Paint and glue drying time (24 hours for some projects)
- Test fitting and adjustments
- Stress-free crafting with your child
Simple costumes like the Mummy or Tourist can literally be assembled the day of Halloween if needed. More complex builds like the Minecraft character or Crayon box benefit from a weekend project timeline.
Pro tip: Take progress photos as you build—kids love seeing the transformation!
Can I wash costumes made with fabric glue and paint?
It depends on the materials and techniques used:
Generally washable (gentle hand-wash):
- Costumes using fabric-specific glue and paints
- Items made with washable markers
- Felt pieces glued to clothing with fabric glue
Not washable:
- Hot glue on fabric (will peel off)
- Regular acrylic paint without fabric medium
- Cardboard elements
- Crepe paper decorations
Best practice: Plan for DIY Halloween costumes to be one-time wear or spot-clean only. If you want a reusable costume, choose methods specifically designed for washing (fabric paints with heat setting, sew-on alternatives) or browse our durable Halloween costumes collection for pieces you can wear year after year.
What's the easiest costume for a beginner who's never done DIY before?
The Mummy costume is hands-down the easiest for absolute beginners:
- Only 2 materials needed (white clothing + crepe paper or gauze)
- No cutting beyond tearing paper
- No measuring required
- Minimal glue/tape needed
- Takes under 30 minutes
- Almost impossible to mess up
- Budget-friendly ($5-$10)
Other beginner-friendly options include:
- Tourist: Just assemble clothes and accessories you probably own
- Scarecrow: Basic gluing of raffia to existing clothes
- Emoji: Simple shapes cut and glued
Beginner success tips:
- Choose costumes with 5 or fewer materials
- Avoid projects requiring precise measurements
- Start with familiar materials (paper, basic glue)
- Have backup costume idea just in case
- Remember: homemade charm beats perfection!
Are no-sew costumes durable enough for school parties and trick-or-treating?
Yes, when properly constructed! Here's how to ensure durability:
Reinforcement techniques:
- Use quality adhesives: Hot glue for permanence, fabric glue for flexibility
- Double-layer stress points: Where kids might grab or pull
- Test mobility: Have child move, sit, reach in costume before event
- Safety pins as backup: Strategic placement can prevent costume malfunctions
- Easy repair kit: Bring glue stick, tape, or safety pins in your bag
Durability by costume type:
- Most durable: Superhero cape, Galaxy clothing, Scarecrow (glued items on clothing)
- Moderate durability: Jellyfish, Emoji, Donut (attached elements)
- Delicate: Mummy, Bubble Bath (consumable materials that may tear or pop)
Real-world testing: Before Halloween night, have your child wear the costume around the house for 30 minutes. This reveals any comfort issues, mobility problems, or weak construction points you can fix in advance.
Most no-sew costumes easily last through a 6-hour school party and 2-3 hours of trick-or-treating. For multiple events, quick touch-ups between wearings keep everything looking fresh!
Final Tips for No-Sew Costume Success
Get Kids Involved
Creating costumes together builds excitement and memories. Age-appropriate tasks include:
- Ages 2-4: Choosing colors, sticking pre-glued pieces
- Ages 5-8: Painting, arranging designs, simple gluing with supervision
- Ages 9+: Measuring, cutting (with safety scissors), hot gluing with supervision
Document the Process
Take photos during creation and on Halloween night. These become treasured memories and help you recreate successful costumes for siblings or friends in future years.
Have a Backup Plan
Even the best-planned DIY projects can go sideways. Keep:
- A simple backup costume idea using items you already own
- Extra materials for quick repairs
- A ready-made piece from our costume accessories collection to enhance any look
Embrace Imperfection
Homemade costumes have unique charm precisely because they're not factory-perfect. Celebrate the creativity, effort, and personality your child's costume represents!
Ready to Create Halloween Magic?
With these 25 no-sew costume ideas and detailed instructions, you're fully equipped to create amazing easy DIY Halloween costumes kids will absolutely love—no sewing machine required! Whether you choose a quick 15-minute Tourist costume or invest a weekend in an epic Minecraft character, the joy of creating together makes the perfect Halloween memory.
Start gathering your materials, pick your favorite design, and get ready for the most creative Halloween yet! And don't forget to check our complete kids costumes collection for ready-made pieces that can complement or inspire your DIY creations.
Happy Halloween crafting! 🎃👻
Looking for more costume inspiration? Browse our full Halloween costumes collection or explore our accessories to add the perfect finishing touch to any DIY creation!
Featured collection


Original price
$28.00
-
Original price
$28.00
Original price
$28.00
$28.00
-
$28.00
Current price
$28.00
Sexy Post Office Girl | Costume-Shop.com
Low stock
Attention all aspiring letter carriers and mail enthusiasts! Prepare to deliver a package of seductive style and naughty charm with our Sexy Post O...
View full details
Original price
$28.00
-
Original price
$28.00
Original price
$28.00
$28.00
-
$28.00
Current price
$28.00


Original price
$110.95
-
Original price
$110.95
Original price
$110.95
$110.95
-
$110.95
Current price
$110.95
Northern Warrior Costume | Costume-Shop.com
Low stock
Upgrade your costume game to legendary status with the Northern Warrior Costume! Designed for rugged adventurers and fearless warriors of the North...
View full details
Original price
$110.95
-
Original price
$110.95
Original price
$110.95
$110.95
-
$110.95
Current price
$110.95
Original price
$33.60
-
Original price
$33.60
Original price
$33.60
$33.60
-
$33.60
Current price
$33.60
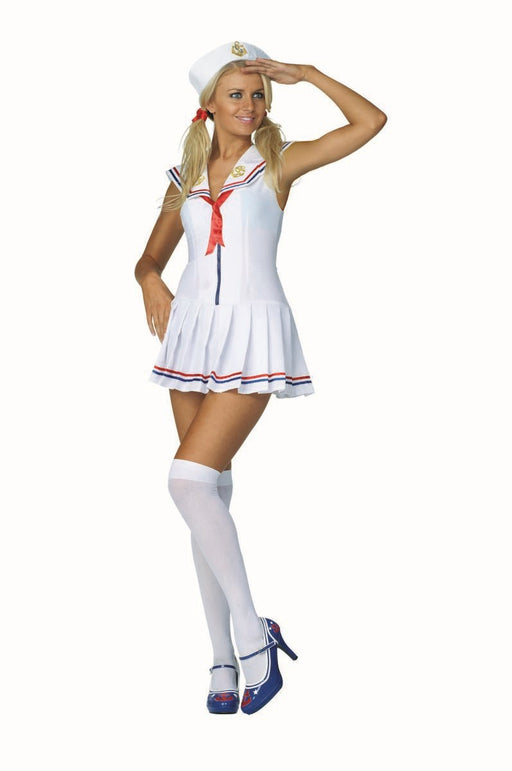
Sailor's Delight | Costume-Shop.com
Low stock
🚢 Navigate the High Seas of Fashion! Command attention at your next party with the Sailor's Delight Costume from www.Costume-shop.com. Perfect for ...
View full details
Original price
$33.60
-
Original price
$33.60
Original price
$33.60
$33.60
-
$33.60
Current price
$33.60


Original price
$97.95
-
Original price
$97.95
Original price
$97.95
$97.95
-
$97.95
Current price
$97.95
Sexy Miss Claus Costume | Costume-Shop.com
Low stock
C170Sexy Miss Claus Costume Includes:Long Robe with Fur Trim Detail, Detachable Belt, & Shorts Material:Stretch Velvet Ships From:Los Angeles S...
View full details
Original price
$97.95
-
Original price
$97.95
Original price
$97.95
$97.95
-
$97.95
Current price
$97.95
Original price
$79.73
-
Original price
$93.24
Original price
$79.73
-
$93.24
$79.73
-
$93.24
Current price
$79.73
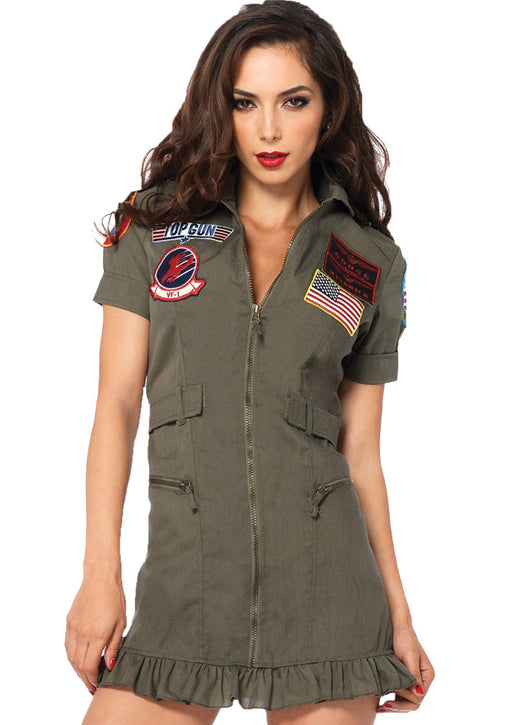
Top Gun Flight Dress | Costume-shop.com
In stock
✈️ Feel the Need for Speed! Elevate your costume game at your next party, Halloween event, or any gathering calling for a bit of high-flying action...
View full details
Original price
$79.73
-
Original price
$93.24
Original price
$79.73
-
$93.24
$79.73
-
$93.24
Current price
$79.73